Week 3

Because the construction for the shaping of the tutu is more complex than the decoration of it, it has taken me almost the entirety of this week to pattern a shape for the bodice that resembles the design I have been given. We have all been given a standard bodice pattern as a starting point and I began making alterations by drawing in pencil where I think the new pattern should be. This looks very messy though and isn’t very clear where I should cut, so I drew over the final lines with a permanent marker.

The idea is that the basque of the tutu will form the shaping at the lower half of the bodice so I cut the bodice to be quite high thinking this would give the right shaping that is shown on the design. I forgot to take any photos of the bodice at that stage but there was hardly any fabric and it didn’t sit on the mannequin nicely. Instead, I chose to revise the pattern, using one of the pencil lines I had marked lower down as a reference. If I choose to keep the basque forming the lower shaping on the bodice then this may still change but for now the bodice has quite a nice shape.

While patterning the bodice, I also wanted to start making the decoration that will be appliqued onto it because they should form a single line at the armpit. In the process of forming this shape I found that the bodice sits too high at the front and didn’t allow the decoration to have enough height at the edges, so I have now pinned the front of the bodice lower so that I can continue making alterations at a later date.

I am not confident how I will continue with the bodice so I am taking a short break to continue working on the tutu plate. After having all of the layers prepared, the next stage is to sew the knickers. There is a standard pattern for this that has been traced onto paper, traced again onto the fabric for the knickers and then the markings are permanently sewn in place so that it is easy to see where the layers need to be sewn to. I will come back to this next week to properly finish the knickers but this is the stage I have left them at.
Week 2

After cutting all layers to length, they needed to be scalloped along one edge. This has taken me most of the week to do as it is a very time consuming process. I would pin the paper pattern into place, cut around the scallops, line up the pattern with the previous scallops, cut again, and so on until this process was complete.

At this point the layers have been scalloped but they still need to be connected as most of the layers are in two or three pieces because of how long they are. To do this, the sections of each layer are sewn one atop another with right side facing wrong side, not right sides together or wrong sides together as is usually the case. Sewing them like this is the best way to reduce bulk.

On layer 7, a channel is sewn widthways. This is done to hold a hoop wire that will be inserted when the tutu plate is near completion. The reason it is sewn onto the seventh layer and not any other is because this is the centre of all the layers and it helps to hold everything flat.

When the layers eventually get sewn to form the tutu plate, it is important to know where the quarter points are. For this, the layers are all thread marked at the midpoint and quarter points by knotting loops of thread into the tulle so that it is easy to identify them.

Tulle can be gathered in different ways and will alter the finished look of the tutu plate. Because this is our first time making a tutu, we have been shown the easiest method to do so. To start with, the ends of the top thread and bobbin thread are held tightly so as not to lose them and the needle is lowered into the machine. When the needle is raised again, there should be a loop from the bobbin thread that is pulled with it. While still gripping the end of the bobbin thread, this loop can be pulled out and used to gather the tulle. Placing this loop into the groove at the centre of the machine foot, it can be sewn over with a zigzag stitch, securing it in place and acting as a piping cord to make the gathering adjustable.

All this fabric takes up a lot of space now gathered and I don’t want to obstruct the tables for anyone so I have rolled and pinned them so they can be placed out of the way. I have also pinned labels to each layer, otherwise it would be hard to identify them at this stage.

Week 1

This first week I have done a lot of preparation work cutting the layers of tulle for the tutu. We were advised to use rotary cutters instead of scissors because they help cut a smoother line and can be quicker to work with. Using one properly wasn’t easy though, the weight you put on the blade, the speed you cut, and the angle of your hand can all affect how well the rotary cutter works. Below you can see the progress of me learning how to use the rotary cutter, the first attempts made rather jagged lines but eventually they started to cut smoother.

While working with the layers of netting, I found that it is easier and more time effective to fold the layers and cut them as one, using pins and weights to keep everything stable and prevent it from slipping while cutting the lines.

Project Introduction

For the tutu project we have to collaborate with the design pathway. The cut and construction of the tutu should follow traditional methods but we have freedom to be creative with the decorations of them. The aim of this project as interpreters is to realise the designs given to us as wholly as possible.

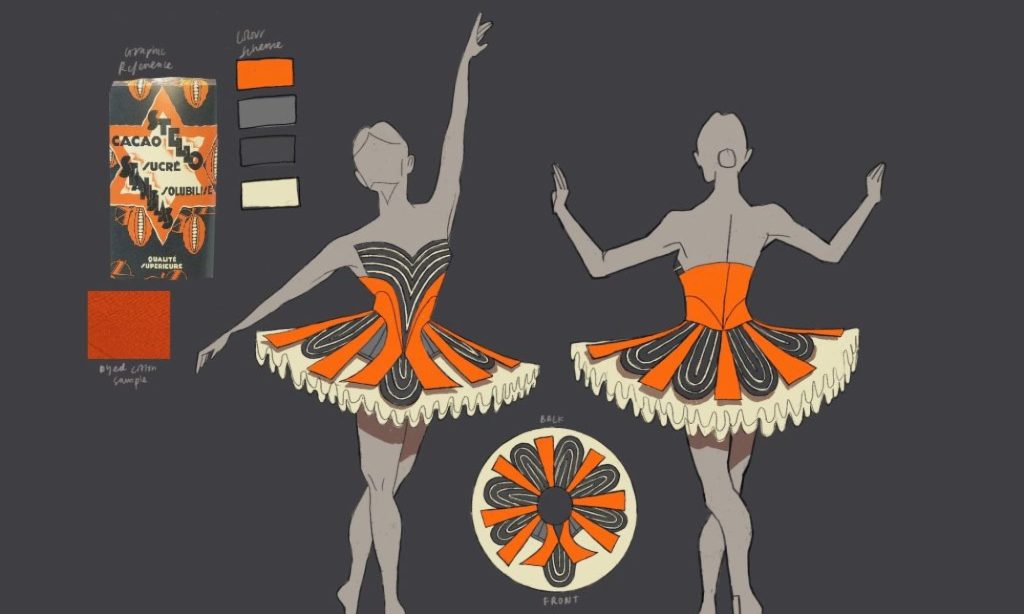
The students on the design pathway have been given the theme of “Art Deco” as a starting point to draw inspiration from when creating their illustrations. The design I have chosen was made by Daisy Bowen and her illustration is shown below.

Design for my tutu – illustrated by Daisy Bowen

Daisy has also made another design (shown below) and this one has been chosen by Isabel Mattar to create a costume for. Because both designs look so similar and we can imagine them being worn together in a performance, Isabel and I will collaborate with each other, using similar fabrics and construction techniques so that they work well as a single piece as well as apart.

Design for Isabel’s tutu – illustrated by Daisy Bowen