Reflective Journal

This entire unit has been hectic and somewhat stressful. We had been promised 10 weeks to work on our tutus which I do believe lulled me into a false sense of security as I spent some time trying to juggle personal projects alongside the tutu. Halfway through week 5 however, we were given just 23 hours to choose between 15+ options for the collaborative projects we should work on. The issues we had with the collaborative projects is that everything felt rather unorganised and rushed, causing us undue stress that could have been avoided if say, instead of just giving us 23 hours to read through project pitches, we had instead been given 15-30 minute lectures about each project in the week leading up to when we have to decide so that we would have been much more informed. Not everyone knew exactly what each project entailed and I do believe a system like this would help everyone be better informed so that they aren’t questioning if they chose the right project for them to work on.

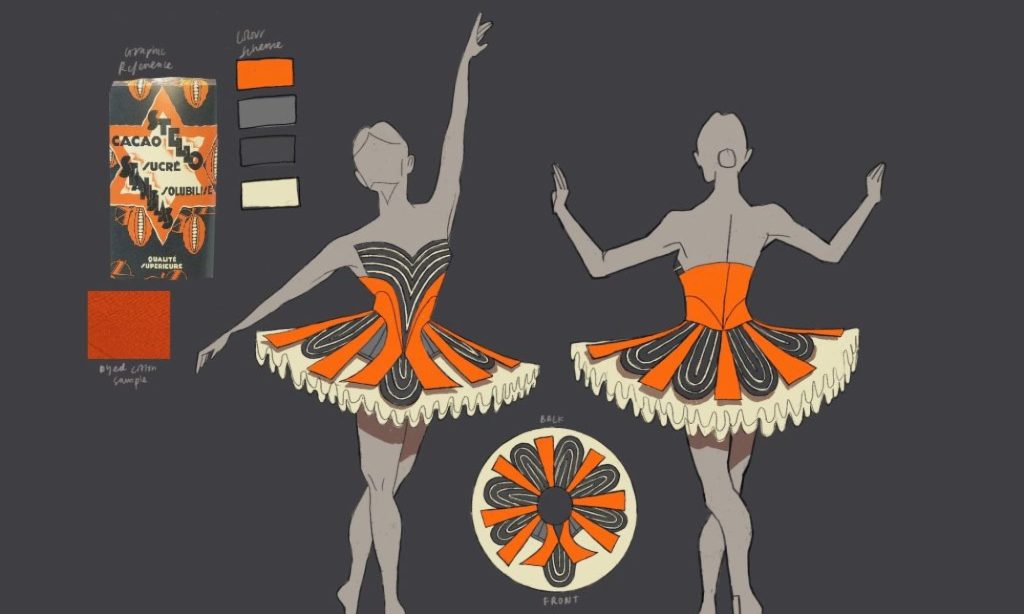
It was nice to be able to choose the tutu designs we work on so that we are actually invested in the costume. I opted for a design that didn’t require an excessive amount of screen printing or painting the fabrics thinking that it would save me time. Instead, my design is structurally complex and I didn’t account for how much time that would take. Over the winter break I didn’t get to relax because I spent most of my days hand sewing because many elements of the costume couldn’t be sewn by machine. On a related note, I need to remember in future to buy more material than I think necessary, I had to stop several times throughout making the tutu after running out of cotton and bias tape.

I am content with the work produced in this unit and I have learnt some valuable skills/lessons that can be carried forward. I do however think there are some improvements that could be made in future to make this unit more manageable for other year groups, e.g. giving prior warning and sufficient information regarding the collaborative projects.
Tech Skills – Catsuit Draft

For the catsuit draft we have been given the same measurements to work from to help simplify the process. Because of the amount lycra stretches, 10% is taken off from the original measurements as the finished garment will expand to fit the body.

Drafting the catsuit is very different to the hip and bodice blocks that we have drafted in the 1st year, the catsuit involved a lot of calculations and had rather strange/confusing steps to follow that will take a lot of time and repetition for me to fully get used to. Something else unusual about this pattern is that the crotch shaping is built only into the centre back whereas when patterning trousers earlier this year, the shaping was built into both the centre front and centre back seams.

Costumes and Headpieces

Alongside the puppetry, our performance also involves elements of acting so costume pieces had to be made for the performers. Rowan and Daria built the wings for Ariel as she is said to transform into a harpy. Daria built the frame with blocks of wood and screws, allowing the wings to pivot and have some motion, while Rowan used calico to decorate and bring the wings to life. Myself and Ellie were tasked with making the headdresses, myself the headpiece for Ariel and Ellie the headpieces for the jester and monkey. Ellie’s headpieces were primarily constructed with a wire frame and calico, including lights that would shine brightly in the dark. Because I ran into issues completing my headpiece for Ariel, Manuela stepped in and made a quick headpiece to be used as a backup if anything else went wrong.

Because Ariel is a spirit, I knew early on that I wanted to give the headpiece a flame/ghost-like quality to emphasize the whimsy of it all. The original plan was to digitally model the headpiece and 3D print it in a white filament. This would have allowed me to separate it into three lightweight parts that are connected via ball joints with a piece of elastic running down the middle. The lighting test worked really well and it would have produced a wonderful glow but I ran into problems with my printer that I didn’t have the time to solve so I had to completely ditch this idea. Instead, I made the base for the new headpiece with a plastic that can be moulded with heat and covered it in calico with a strip of metal boning up the centre that would hopefully still give some of the movement that I intended. Given the time constraints, I am fairy pleased with the shape of it but I would have preferred to stick to the original plan if I had been able to.

Shadow Puppetry

Manuela and Yumeng organised the shadow puppetry between the two of them. They used a flexible pipe with a special fabric that diffuses the light from the torch to create the screen. The actual shadow puppets themselves I think are excellent! They used coloured films so that when the light passes through, the characters would be brightly coloured and provide a good contrast to the monotonous colours used for the bull and other costume pieces. The shadow puppetry section of the performance tells this elaborate story about the larger bull puppet so the characters need to show emotion. The girls managed to achieve this by having the arms and torso held on rods so that the arms can be used to signal what is happening.

Bull Puppet

The bull puppet is absolutely gorgeous and although I helped skin a large portion of it with calico, I can’t take any credit for the main construction of this thing. At its full height the puppet stands at over 3 metres tall and 2 metres wide. Jane made the bull’s head almost entirely by herself, starting with a wire frame to provide some structure and covering it in cardboard and papier-mache to build some body and give it its form. The ears she has placed on springs that are embedded into the head so that they bounce when the head moves and there is a jaw that can open to help show some range of emotion. To give the height needed, the head is held on a long PVC tube that after testing, Jane uses an apron to help the bear the weight of it as it is heavy.

Though we all helped where we could, Katie, Lucy and Amelia are the three that took charge of building the frame for the puppet and devising how it can be separated/put together. Because it is so big when fully put together, it was important to think about how it can be dismantled to be put in transit so the girls have divided it into 7 key parts: back legs, front legs, bum, back body, front body, inside frame, head. The structure is built from willow bent into shape and the original plan was to have one person in the front of the bull and two people at the back, supporting the weight with the backpacks. We found that the backpacks were quite cumbersome though and didn’t help much so a separate internal structure was built to support the weight on the shoulders of two people (one front and back) while two other stood either side of the back person to puppeteer the legs.

Travelling Tales Introduction

For this collaborative project titled “Travelling Tales”, we have been asked to create a puppet(s) based on a piece of text. Our group chose The Tempest and focused on one aspect of the play where there are two drunk guards having nightmares about a bull. Instead of just copying the text exactly, we chose to deviate from the original source and create our own adaptation to bring more impact to this part of the story.

In our adaptation, Ariel tells a story about a storm brewing and how the bull (our main puppet) is afraid of it. The two drunk guards, a jester and a monkey tease the bull and make fun of him for being afraid of the storm when a creature of his size is so strong and powerful. The reason the two guards aren’t afraid is because of the fruit that made them drunk, and so they offer it to the bull to calm his nerves.

While the centrepiece of the performance is a large bull puppet, measuring approximately 3 metres tall and 2 metres wide, that we will perform with, elements of the story will be told with shadow puppetry and there will also be some members of the group acting as some of the characters in the story to help guide the audience as events unfold.

Tech Skills – Leotard

For the leotard, we were given a standard block to trace off so that we don’t have to waste time patterning it as we are already drafting catsuits.

After tracing the patterns onto paper and seam allowances added, they were traced onto the lycra and all key marking were transferred to the lycra using a tracing wheel.

So that it can also be seen from the right side, all markings are loosely tacked into place, stretching the fabric while tacking so that it doesn’t affect the stretch of the fabric. All side seams are then also tacked together before securing the seams with the overlocker.

The two legs are sewn differently to each other – one has elastic sewn just outside the seam allowance, when it is overlocked it gets folded over so that the fold is the finishing line. The other has a 3cm wide strip of lycra that is butted just inside the seam allowance, when this is overlocked it will create a channel and when pressed to the right side, the edge of the channel forms the finishing line. The armholes are sewn the same as the latter method but without having elastic inserted.

With all seams overlocked, the seams get pressed open and a piece of elastic is threaded through the leg channel.

To finish the neckline, a special elastic webbing is used. There is a line up the centre that gets pinned to the marking for the neckline and is tacked in place to the inside of the neckline. This allows the webbing to be lifted so that the fabric can be cut away at the neckline, making it possible to fold the webbing over the neckline and securing it with a short zigzag stitch.

The final step in completing the leotard was overlocking the crotch seam and sewing the shoulder straps to the front and back with a zigzag stitch, backstitching plenty of times to ensure a secure connection.

Evolution of the Tutu

The earliest tutu can be dated back to 1832 in the La Sylphide ballet in Paris. The ballet starred Marie Taglioni in a dress made of a white bodice and bell-shaped skirt that was cut just above the ankles. The costume quickly became the standard dress for ballerinas and sparked what is now known as the romantic era of ballet. The creation of the tutu was only made possible due to the advances of technology in the Industrial Revolution, cotton muslin and gauze (materials used to make tutus) were no longer only available in India and could be produced worldwide. Also, bobbinet (or tulle, as it is known today), a fabric previously made by hand could now be mass produced on weaving machines, this is notable because lots of tulle is needed to make the layers of the skirt, creating the illusion that the dancer is floating.

Towards the end of the 19th century, the style of dance used in ballet had developed and the style of the tutu had to evolve alongside it. Footwork and elegant leg movements had now become a big part of ballet and the low-cut dresses in the early part of the century would have been too restrictive, so the tutu was cut shorter to above the knee, allowing the legs to be seen and freeing the feet of any obstructions. This style of tutu also featured an elaborately decorated bodice and became known as the classical era of ballet as it is the silhouette most people imagine when they think of a ballerina.

Regardless of the role they played, the tutu had become the uniform of all ballerinas by the 20th century. The Ballets Russes however, a company founded by Sergei Diaghilev, was created to challenge and rebel against these ideas of how a ballerina should look. Instead of a single uniform, the Ballets Russes featured costumes that were designed specifically to the theme of each ballet.

Around the mid-20th century, we see tutus emerging that are more similar to the modern, “pancake”, tutu of today. To achieve this pancake style of silhouette, metal hoops came into use to help provide some structure to the skirt.

The tutu changed shape again in the late 1940s when Georgian-American choreographer
George Balanchine imagined a tutu that would allow audiences to see the dancer’s
movements without the inhibitions of a large skirt. Balanchine enlisted the help of costume
maker Barbara Karinska to bring his vision to life, creating the “powder puff” tutu that only
used 6-7 layers of tulle instead of the usual 10-12 layers, resulting in a smaller, shorter, and
lighter tutu. This wasn’t Karinska’s first innovation with the tutu though, some decade prior
she introduced the practice of cutting the side panels of the bodice on the bias. This allowed the bodice to sit tighter than it had before whilst also increasing the movement that the performers could have.

Sources:

https://pointemagazine.com/tutus/

Regency and Victorian Dance

In coalition with the industrial revolution, early 19th century saw an astounding increase in the production of printed materials, including music.  A country dancing tune of this era might be published in dozens of written sources, each paired with a different image of dancing figures. With this, the traditional ideas of a link between tune and dance figures had been severed. In the early 19th century people were encouraged to create new figure sequences to pair with music, this process of pairing movements with sound was known as “calling” a dance. In ceremonies, couples would take turns to “lead off” a country dance and the master of the ceremony would give instructions between the dancing couple and the band, almost how a conductor manages an orchestra.

During this time, Europe was at war with each other, but dances were still borrowed between countries. Lower and middle classes were beginning to have a bugger influence on popular dance, with modified country dances replacing earlier, formal styles of dance. Balls now opened with a polonaise or a Grand March that also provided a fashion display. Stage dance as well began to take shape, being separate from the ballroom dances and is the beginnings of Classical Ballet as we know it today.

Baroque Dance

Baroque dance is the standard name given to the style of dance with origins in the 17th century and remained well into the 18th century until the French Revolution. King Louis XIV had a major influence in its development, being an accomplished dancer by age 14. His courtiers were expected to dance in this new style at formal balls and were also performed in court ballets, similar to the Stuart court masques that took place during the same era. It ought to be noted that 17th century dance wasn’t merely of great social importance but carried political importance as well, hence why dances took p[lace in court rooms, something that would be highly unusual to witness today.