Week 8

Following from the end of last week, I permanently hand sewed the lower bodice into place. This was painful sewing around that tight corner and it was hard to line up evenly as I hadn’t marked the position of the overlap properly on the upper bodice. These issues with lining it up resulted in the lower bodice sitting higher up at the back than expected. While not intentional, the more I look at it, the more I like it being higher at the back.

With the two bodice halves sewn together, I wanted to hem the bottom edge. First though, the boning on the centre back needed to be sewn in place as it is encased inside the bodice. This was done by sewing a channel in the right side of the centre back and cutting a piece of boning to length to slide inside. This way, when the top and bottom of the bodice are hemmed, the boning will be held inside.

When hemming the underside, I also trimmed down the seam allowance from the top half of the bodice to reduce bulk and snipped into any tight corners so that the fabric would fold nicely at the hem.

To further reduce wrinkles on the bodice, boning needs to be placed along some of the seam allowances. Casings are sewn in petersham, the bonings are cut to size, inserted into the casings, and sewn onto the centre front, side-side-front, and side-side-back with a herringbone stitch. Ballet dancers have to maintain mobility so boning can’t be sewn onto the bust seams or side seams.

Now that the boning channels are sewn into place, it’s time to finish the bodice. To finish the top seam, piping had to be sewn on. This was made by cutting a strip of the top fabric, matching the grainline to the bodice, and sewing with a piping cord inside.

The piping was then sewn to the tack line and any excess fabric facing the inside of the bodice was trimmed to neatly fold the piping over. The piping is then sewn to the inside to create a finished edge, nearing the completion of the bodice.

The final step of the bodice and the last thing I did this week was sew the the fastenings on the back. These are sewn in the same way as the fastenings on the tutu plate. The more securely these are sewn, the better.
Week 7

This last week has been a little bit all over the place so you will see me jumping between different elements of the tutu depending on what I felt like working on in that moment.

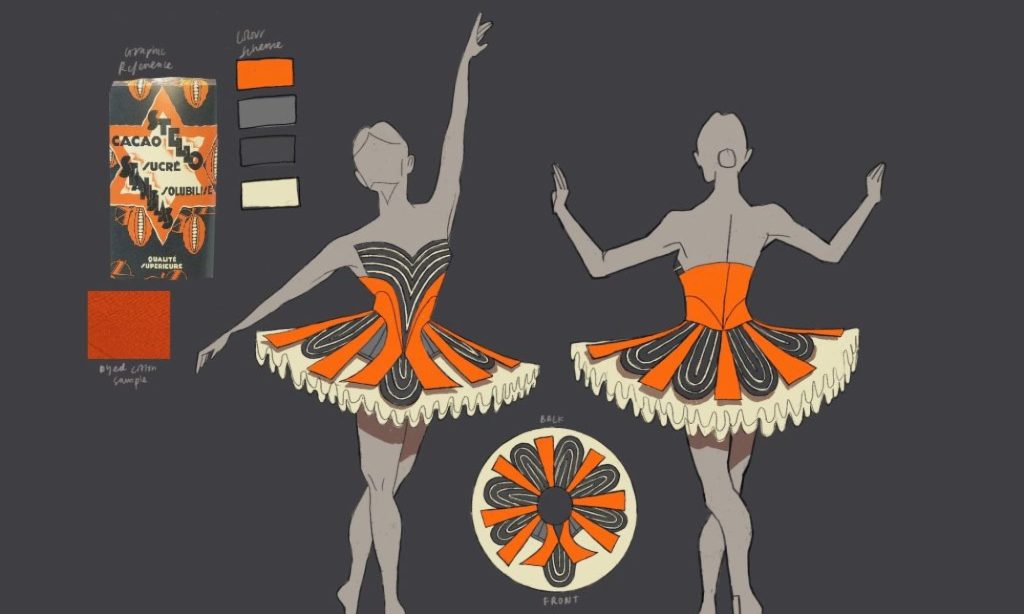
The week began by cutting the lower bodice from the top fabric, sewing up the seam and pinning into place on the bodice. I also placed the patterns for the decorations to see how it looks together. Doing this I noticed two things: the fabric is really wrinkled because there is nothing to support it and I will likely have to hand sew this lower bodice to the top part of it. It was really difficult to pin around the tight curve at the front and I don’t think it will be possible to sew that by machine.

Frustrated with thinking about how to solve some of the problems on the lower bodice, I took a break from that and made a pattern for a top plate. I remember being told that it is needed to help sew the decorations flat to the tutu plate and it felt like the perfect distraction from the other things that needed doing.

It seemed too daunting to cut the netting from the pattern for the top plate so I switched again to make the orange decorations on the top plate. To keep them flat, I tacked them down to a layer of netting to help provide some support.

Cutting and tacking the orange decorations was a long and tedious process because the thread kept catching on the netting as I was trying to pull the needle through. This caused me to become a bit tired of it so I resumed what I was doing with the lower bodice shaping. I wanted to see if a backing fabric would make a difference so I cut the pattern from the same fabric used to support the bodice panels and tacked the top fabric for the left side of the bodice to it.

Tired once again of what I was doing, I started to hem one of the orange decorations. This is a process that was worse than tacking the fabric to the netting. As before, the thread kept catching on the netting and mitring the corners was a bit of a nightmare. In all, it took between half an hour to an hour just to hem this one piece. Rather unsurprisingly, I only hemmed two out of the seven total because I was getting tired. I will continue to hem the others over the course of the next week or two, in-between other elements of constructing the tutu.

To finish off the week, I returned to working on the top plate. I am short on netting so I had to separate it into four parts, with a seam up the centre and a seam on each outer edge. I’m not entirely happy with how it looks with these excess seams but it isn’t too noticeable. To complete the top plate, I sewed halfway up the back as with the layers below so that it can be worn and then the top plate was hand sewn to the basque at layer 10.

Before the end of the week, I pinned in place the other half of the lower bodice to compare side with backing fabric and the side without. The left side of the lower bodice with a backing fabric looks much flatter than the side without, I will definitely need to take apart the right side next week and sew it to match the left.

Week 6

Marking the final week before the winter break, week 6 was dedicated to finalising the tutu plate and doing any prep work so I can continue with this over the holidays. Now that all layers are attached and sewn to the basque, the centre back of the knickers is finished with a French seam. All layers are then sewn closed halfway up the back seam apart from layer 7 which needs to remain open until the hoop wire is inserted into the channel.

Before putting the hoop wire into the channel sewn on layer 7, the ends of the wire were wrapped in tape so that it doesn’t damage the tulle or the person wearing the tutu and the layers above layer 7 were held to the body of the mannequin, wrapped in spare netting, to make it easier to feed the wire through the channel. A pen cap was also used on the end of the wire to help guide it through the channel, alternately pushing the wire and pulling the netting until the wire is pushed all the way through. Once the wire is pushed through fully, the exposed wire was then joined by wrapping spare netting tightly around it 2-3 times. The netting was then secured with a cross stitch, preventing the wire from springing apart and hurting anyone during a performance.

The penultimate step in constructing the tutu plate was flat-felling the crotch seam. This was not easy to do because I had to squeeze some of the layers under the machine too so the seam isn’t quite as straight as I would like it to be.

Now the mass of tulle is finally starting to look like a tutu and it is very exciting at this stage. Before I could do any more though, I had to flatten the tutu. We did this by using a giant wooden board and placing sewing machines on top to weight it down. It has to be left for at least 24 hours like this to flatten properly and it is very satisfying when you lift the board and the tutu plate stays flat, instead of springing up as you would expect it to.

This is the moment I have been waiting for, to finalise the pattern of the bodice with the tutu plate for context. With the tutu plate complete, I drew a paper pattern to see if I could build the lower shaping of the bodice as a separate piece that could be sewn on. I have to say, this looks much nicer than when I attempted to build the shaping from the basque and this is definitely what I will use moving forward. Although only paper, the shape of it flows really nicely from the plate and around to the back of the bodice.

Before packing to go home that night I found a scrap piece of fabric that is the perfect size for the orange decorations on the plate so I have made a pattern from it and will use that to cut the fabric from. I am really pleased with how it slightly tapers to the outside.

The last pattern to make was the navy petal decorations and I drew these using a French curve to get smooth lines. I then placed it between two of the patterns for the orange decorations and adjusted until the pattern matched the design. The bodice and bodice decoration were also on the mannequin at this point and it was nice to gauge an idea of how the finished tutu might look.

Before taking my things home for the holidays, I wanted to at least have the bodice sewn together. the first stage of this was cutting the patterns from the top fabric and backing fabric, marking the backing fabric, and then tacking the two together. Tacking the velvet to a stable fabric like this helps to reduce the wrinkles and gives the fabric a smoother appearance.

With all panels tacked to their respective backing fabrics, they were sewn together and all raw seams overlocked.

Et voila! The base of the bodice is sewn together before I go home for the holidays. I do feel it’s a little loose at the front so I might adjust that at a later date but for now it is looking good and I am really happy to see it finally taking shape.

Week 5

Week 5 has been a slow one. All layers were sewn to the knickers by the end of week 4 but parts of the tulle were gathered too tight so the knickers had to be stretched to snap any threads that were shrinking the knickers. This meant that I had to go back and hand stitch parts of each layer back down to the knickers to prevent it falling apart. With the tutu plate nearing completion, I tried a test fit with the bodice to see if the basque could be cut to form the shape shown in the illustration. The bodice doesn’t look quite right so I will have to form the shaping some other way, likely by appliqueing over the top of the bodice.

Knowing that the basque doesn’t need to be cut to a different shape, I followed the pattern to create the standard basque form. The back of the basque has to overlap at the centre front, this is done by folding the left side, touching the edge of the seam allowance to the marked line and trimming the right side to that fold. Now, when both sides are hemmed, they overlap at the centre back and match the centre front line.

The waistband of the basque was sewn in petersham with small elastic pieces sewn into the sides. This allows the waistband to be malleable and form to the body it is sitting on.

With the basque now complete, the Tutu plate is sewn to it by hand as it is difficult to try and fit all of the material under the sewing machine. The basque was then fitted with fastenings to close it around the body. My first attempt at sewing the fastenings wasn’t secure enough and all the stitches came undone so it is important that these be hand sewn well to prevent them from coming loose.